How To Build A Gable Roof

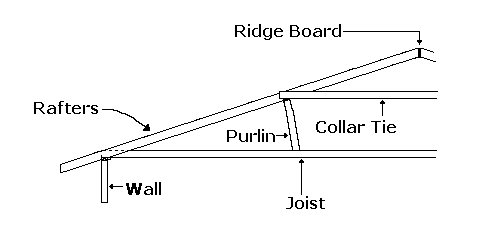
Next come the ceiling Joist. A Joist is a board or timber that runs from one wall across to the opposite wall (Let's say the North and South Wall). The Joist serves a couple of purposes. They provide structural rigidity, provide a platform for a floor and give you something to attach the Rafters too, which will prevent the outward pressure of the Rafters from pushing the walls outward and collapsing the structure.
The tops of the Joist at each end where they lay atop the wall and top plate are usually trimmed so that they do not stick up above the Rafters and interfere with laying a flat roof.
Now that the Joists are nailed in place you will need a Ridge Board and Rafters.
The Ridge Board is a board or timber that is long enough to run at least from the East wall to the West wall. Longer if the roof will overhang the wall to keep water off the walls.
The Ridge Board will form the peak of the roof.
A Rafter installed at a 4/12 pitch rises 4 feet for every 12 feet of flat distance it covers.
The distance from outside wall to outside wall is 14 feet = 168 inches. (14X12). Now subtract the width of the ridge plate. 168"-1.5"=166.5" 1.5 inches for a typical board. Now divide by two. 166.5 divided by 2 = 83.25 inches. This is the length each of your Rafters will span to reach the wall.
If the peak of the roof is 3 feet high (36 inches) then that is the other number we needed. Now the formula is (83.25 X 83.25) + (36 X 36) yields 6930.56 + 1296 which yields 8226.56. Now we need the square root of 8226.56. Or what number times itself equals 8226.56? And that number is 90.7! So the Rafters would need to be at least 90.7 inches.

Rafters run from the Ridge Board down to the top of the walls top plate. Rafters usually extend past the top plate by 16 inches or so. The length of the Rafters depends on the rise of the roof and how far past the walls you want the Rafters to extend.
Cut a triangular notch similar to the shape of a bird's beak in the Rafters at the place where they will rest on the top of the walls. Since the Rafters slope down to the top plate from the ridge plate they need this cut so the angled Rafter will have a flush surface to rest on the top plate.
A roof will consist of a large number of Rafters so cut two and the test the cut on the roof to see if it is correct. It should fit flush with the Ridge Board and the top plates. Then and only then go back and cut the rest of your Rafter.
Cut a collar tie for the Rafter pairs. Nail or screw in place near the Ridge Board. It will help stabilize the Rafters. Then nail the Rafter to the ridgeboard and the top plate.
Build your Rafters about 16 inches apart.
Nail a board on the ends (overhang/eaves) of the Rafters once all of the Rafters are in place.
Now you need to apply plywood or planks or something as weather-proof as possible to the Rafters. Plywood then roofing felt and then shingles are used by many modern houses. What you use will depend on what you have available.
Finished!
A purlin is a board nailed from Joist to Rafter to help strengthen the roof and prevent sagging.
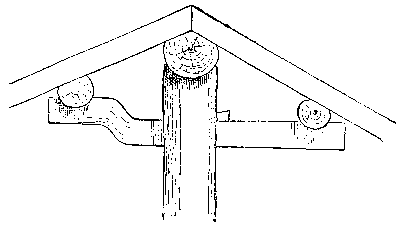
Get innovative. This isn't the only way that Gable roofs are made. This is just one of the designs. Get innovative like in the second picture where straight limbs are shaved with an ax or saw to provide a flat surface where needed.
